SpringMVC运行流程
SpringMVC框架是Spring为展现层提供的基于MVC设计理念的优秀Web框架,是目前最主流的MVC框架之一。而它的强大之处就是通过一套MVC注解,让POJO成为处理请求的控制器,而无需实现任何的接口。
那么现在,我们开始探寻SpringMVC的运行机制。下面是SpringMVC的运行流程: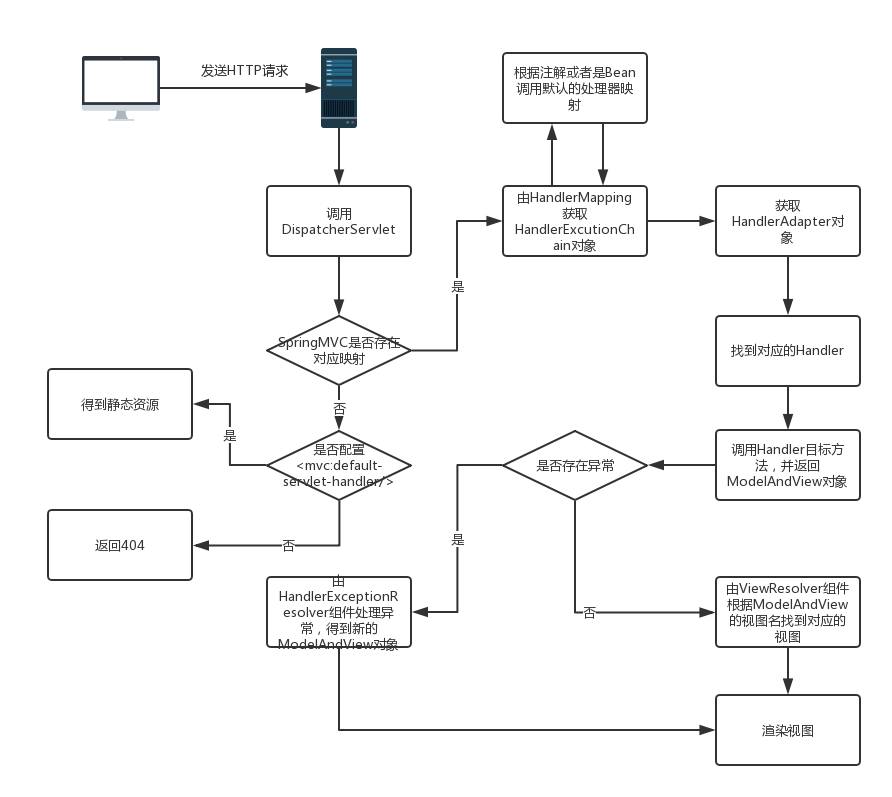
配置SpringMVC
SpringMVC框架围绕DispatcherServlet这个核心展开,它负责截取请求并将其分派给相应的处理器处理。SpringMVC框架包括注解驱动控制器、请求及响应的信息处理、视图解析、本地化解析、上传文件解析、异常处理及表单提交等内容。
配置DispatcherServlet,截获特定的URL请求
我们知道,在传统的JavaWeb项目中,我们可以在web.xml文件中配置一个servlet,然后通过<servlet-mapping>指定其处理的URL。假设我们希望SpringMVC的DispatcherServlet能够截获并处理所有以.html结束的URL请求,那么可以在web.xml中按如下方式进行配置:
1 | <listener> |
在①处通过contextConfigLocation参数指定业务层Spring容器的配置文件。然后调用ContextLoaderListener根据业务层Spring容器的配置文件启动业务层的Spring容器。
在②处配置了名为dispatcherServlet的DispatcherServlet,它默认自动加载/WEB-INF/dispatcherServlet-servlet.xml(<servlet-name>-servlet.xml)的Spring配置文件,这里显式地指定为WEB-INF目录下的springmvc.xml文件作为SpringMVC的配置文件。
在③处通过<servlet-mapping>指定dispatcherServlet处理所有HTTP请求。
编写处理请求的控制器
配置DispatcherServlet之后,开始编写处理请求的控制器。SpringMVC通过@Controller注解既可以将一个POJO转化为处理请求的控制器。通过@RequestMapping指定控制器需要处理的URL。下面是一个实例:
1 |
|
首先使用@Controller对UserHandler类进行标注,使其成为一个可以处理HTTP请求的控制器。然后使用@RequestMapping对其中的helloWorld()方法进行标注,确定其处理的url为“hello”。helloWorld()方法返回了一个字符串“success”,它代表一个逻辑上的视图名,会被具体的视图解析器解析成一个具体的视图对象。稍后将讲解如何编写视图解析器和视图对象。
编写视图解析器和视图对象
在配置文件中注册视图解析器:
1 | <bean class="org.springframework.web.servlet.view.InternalResourceViewResolver"> |
在这个bean中,配置了视图对象的前缀和后缀,这样在返回的“success”字符串便会映射为/WEB-INF/views/success.jsp。这样,就会将这个jsp文件的视图内容进行渲染。
编写视图对象
在/WEB-INF目录下新建views文件夹,在里面新建success.jsp文件。本例中的控制器处理完后,将会转向到这个页面。代码如下:1
2
3
4
5
6
7
8
9
10<%@ page contentType="text/html;charset=UTF-8" language="java" %>
<html lang="en">
<head>
<meta charset="UTF-8">
<title>success</title>
</head>
<body>
<h1>SUCCESS PAGE</h1>
</body>
</html>
这样我们就能在host:port/WebRoot/hello这个url下看到这个页面了。
探究SpringMVC运行的内部机制
DispatcherServlet的初始化
在DispatcherServlet创建后,会按照它的一部分默认配置进行启动,这些默认配置可以在DispatcherServlet初始化过程中通过更改初始化参数进行修改。下面是一些常用的配置参数:
namespace:DispatcherServlet对应的命名空间,默认为
<servlet-name>-servlet,用于构造Spring配置文件的路径。ContextConfigLocation:如果DispatcherServlet上下文对应的Spring配置文件有多个,则可以使用该属性按照Spring资源路径的方式指定。
publishContext:布尔类型的属性。默认为ture。DispatcherServlet根据该属性决定是否将WebApplicationContext发布到ServletContext的属性中,这样可以让使用者使用ServletContext找到WebAppliactionContext实例,对应的属性为可以通过getServletContextAttributeName()方法找到。
publishEvents:布尔类型的属性。当DispatcherServlet处理完一个请求后,是否需要向容器发布一个ServletRequestHandledEvents事件,默认为true。如果容器中没有任何事件监听器,则可以将该属性设置为false,以便提高性能。
这些属性是如何获取的呢?我们知道servlet在初始化阶段会调用其init方法,所有我们首先要查看在DispatcherServlet中是否重写了init方法。我们在它的父类HTTPServletBean中找到了这个方法。代码如下:1
2
3
4
5
6
7
8
9
10
11
12
13
14
15
16
17
18
19
20
21
22
23
24
25
26
27
28
29
30
31
32
33
34
35
public final void init() throws ServletException {
if (logger.isDebugEnabled()) {
logger.debug("Initializing servlet '" + getServletName() + "'");
}
// Set bean properties from init parameters.
// 解析init-param并封装到pvs中
PropertyValues pvs = new ServletConfigPropertyValues(getServletConfig this.requiredProperties);
if (!pvs.isEmpty()) {
try {
//将当前的这个servlet类转化为一个BeanWrapper,从而能够以Spring的方式来对初始化参数进行注册
BeanWrapper bw = PropertyAccessorFactory.forBeanPropertyAccess(this);
ResourceLoader resourceLoader = new ServletContextResourceLoader(getServletContext());
//注册对于Resource类型的属性编辑器
bw.registerCustomEditor(Resource.class, new ResourceEditor(resourceLoader, getEnvironment()));
initBeanWrapper(bw);
//注入属性
bw.setPropertyValues(pvs, true);
}
catch (BeansException ex) {
if (logger.isErrorEnabled()) {
logger.error("Failed to set bean properties on servlet '" + getServletName() + "'", ex);
}
throw ex;
}
}
// Let subclasses do whatever initialization they like.
initServletBean();
if (logger.isDebugEnabled()) {
logger.debug("Servlet '" + getServletName() + "' configured successfully");
}
}
DispatcherServlet的初始化过程主要是通过将当前的servlet类型实例转化为BeanWrapper类型实例,以便使用Spring中提供的注入功能进行对属性的注入。这些属性就是servlet的配置参数。Spring会保证这些参数被注入到对应的值中。属性注入主要包含以下几个步骤:
封装并验证初始化参数
ServletConfigPropertyValues是一个在HttpServletBean的内部类,它除了封装属性外,还有对属性验证的功能,它的构造函数代码如下:1
2
3
4
5
6
7
8
9
10
11
12
13
14
15
16
17
18
19
20
21
22
23
24
25public ServletConfigPropertyValues(ServletConfig config, Set<String> requiredProperties) throws ServletException {
//如果requiredProperties为空,missingProps就为空,否则新建一个HashSet储存missingProps。
Set<String> missingProps = (!CollectionUtils.isEmpty(requiredProperties) ? new HashSet<String>(requiredProperties) : null);
//得到初始化参数
Enumeration<String> paramNames = config.getInitParameterNames();
while (paramNames.hasMoreElements()) {
String property = paramNames.nextElement();
Object value = config.getInitParameter(property);
addPropertyValue(new PropertyValue(property, value));
if (missingProps != null) {
missingProps.remove(property);
}
}
// Fail if we are still missing properties.
//如果missingProps为空,抛出异常
if (!CollectionUtils.isEmpty(missingProps)) {
throw new ServletException(
"Initialization from ServletConfig for servlet '" + config.getServletName() +
"' failed; the following required properties were missing: " +
StringUtils.collectionToDelimitedString(missingProps, ", "));
}
}
从代码中可知,封装属性主要是对初始化的参数进行封装,也就是servlet中配置的<init-param>进行封装。当然,用户也可以通过对requiredProperties参数的初始化来强制验证某些属性的必要性,这样在属性封装的过程中,一旦检测到某些requiredProperties中的属性没有指定初始值,就会抛出异常。
将当前servlet实例转化成BeanWrapper实例
PropertyAccessorFactory.forBeanPropertyAccess是Spring中提供的工具方法,主要用于将指定实例转化为Spring中可以处理的BeanWrapper类型的实例。
注册对于Resource类型的属性编辑器
属性编辑器的原理是可以将非基本类型的属性进行处理,比如将Date属性转成字符串属性。在这里,属性编辑器一旦遇到Resource类型的属性将会使用ResourceEditor进行解析。
注入属性
bw.setPropertyValues(pvs, true);通过这行代码将属性注入。
初始化servletBean
HttpServletBean的子类FrameworkServlet覆盖了它的initServletBean函数,如下:1
2
3
4
5
6
7
8
9
10
11
12
13
14
15
16
17
18
19
20
21
22
23
24
25
26
27
28
protected final void initServletBean() throws ServletException {
getServletContext().log("Initializing Spring FrameworkServlet '" + getServletName() + "'");
if (this.logger.isInfoEnabled()) {
this.logger.info("FrameworkServlet '" + getServletName() + "': initialization started");
}
long startTime = System.currentTimeMillis();
try {
this.webApplicationContext = initWebApplicationContext();
//设计为子类的覆盖
initFrameworkServlet();
}
catch (ServletException ex) {
this.logger.error("Context initialization failed", ex);
throw ex;
}
catch (RuntimeException ex) {
this.logger.error("Context initialization failed", ex);
throw ex;
}
if (this.logger.isInfoEnabled()) {
long elapsedTime = System.currentTimeMillis() - startTime;
this.logger.info("FrameworkServlet '" + getServletName() + "': initialization completed in " +
elapsedTime + " ms");
}
}
上面的函数使用了计时器来统计初始化的执行时间,并且提供了一个扩展方法initFrameworkServlet()用于子类的覆盖操作。而作为关键的初始化逻辑实现则委托给了initWebApplicationContext()方法。
WebApplicationContext的初始化
initWebApplicationContext函数的主要工作就是创建或刷新WebApplicationContext实例并对servlet功能所使用的变量进行初始化。initWebApplicationContext函数在FarmeworkServlet中实现,代码如下:1
2
3
4
5
6
7
8
9
10
11
12
13
14
15
16
17
18
19
20
21
22
23
24
25
26
27
28
29
30
31
32
33
34
35
36
37
38
39
40
41
42
43
44
45
46
47
48
49
50
51protected WebApplicationContext initWebApplicationContext() {
WebApplicationContext rootContext =
WebApplicationContextUtils.getWebApplicationContext(getServletContext());
WebApplicationContext wac = null;
if (this.webApplicationContext != null) {
// 在构造时注入context文实例
wac = this.webApplicationContext;
if (wac instanceof ConfigurableWebApplicationContext) {
ConfigurableWebApplicationContext cwac = (ConfigurableWebApplicationContext) wac;
if (!cwac.isActive()) {
// The context has not yet been refreshed -> provide services such as
// setting the parent context, setting the application context id, etc
if (cwac.getParent() == null) {
// The context instance was injected without an explicit parent -> set
// the root application context (if any; may be null) as the parent
cwac.setParent(rootContext);
}
//刷新上下文环境
configureAndRefreshWebApplicationContext(cwac);
}
}
}
if (wac == null) {
// 根据contextAtrribute属性加载WebApplicationContext
wac = findWebApplicationContext();
}
if (wac == null) {
// No context instance is defined for this servlet -> create a local one
wac = createWebApplicationContext(rootContext);
}
if (!this.refreshEventReceived) {
// Either the context is not a ConfigurableApplicationContext with refresh
// support or the context injected at construction time had already been
// refreshed -> trigger initial onRefresh manually here.
onRefresh(wac);
}
if (this.publishContext) {
// Publish the context as a servlet context attribute.
String attrName = getServletContextAttributeName();
getServletContext().setAttribute(attrName, wac);
if (this.logger.isDebugEnabled()) {
this.logger.debug("Published WebApplicationContext of servlet '" + getServletName() +
"' as ServletContext attribute with name [" + attrName + "]");
}
}
return wac;
}
对于该函数中的初始化方法,主要包含以下几个部分。
寻找或创建对应的WebApplicationContext实例
WebApplicationContext的寻找及创建包括以下几个步骤。
- 通过构造函数的注入进行初始化
当进入initWebApplicationContext函数后通过判断this.webApplicationContext!=null后,便可以确定this.webApplicationContext是否是通过构造函数来初始化的。
- 通过contextAttribute进行初始化
通过在web.xml文件中配置的servlet参数contextAttribute来查找ServletContext中对应的属性,默认为WebApplicationContext.class.getName()+”.ROOT”,也就是在ContextLoaderListener加载时会创建WebApplicationContext实例,并将实例以WebApplicationContext.class.getName()+”.ROOT”为key放入ServletContext中,当然也可以重写初始化逻辑使用自己创建的WebApplicationContext,并在servlet的配置中通过初始化参数contextAttribute指定key。1
2
3
4
5
6
7
8
9
10
11
12protected WebApplicationContext findWebApplicationContext() {
String attrName = getContextAttribute();
if (attrName == null) {
return null;
}
WebApplicationContext wac =
WebApplicationContextUtils.getWebApplicationContext(getServletContext(), attrName);
if (wac == null) {
throw new IllegalStateException("No WebApplicationContext found: initializer not registered?");
}
return wac;
}
- 重新创建WebApplicationContext实例
如果通过以上两种方法都没有成功,那么就只能重新创建新的实例了。1
2
3
4
5
6
7
8
9
10
11
12
13
14
15
16
17
18
19
20
21
22
23
24
25
26
27
28
29
30
31
32
33protected WebApplicationContext createWebApplicationContext(WebApplicationContext parent) {
return createWebApplicationContext((ApplicationContext) parent);
}
protected WebApplicationContext createWebApplicationContext(ApplicationContext parent) {
//获取servlet初始化参数contextClass,如果没有就默为XmlWebApplicationContext.class
Class<?> contextClass = getContextClass();
if (this.logger.isDebugEnabled()) {
this.logger.debug("Servlet with name '" + getServletName() +
"' will try to create custom WebApplicationContext context of class '" +
contextClass.getName() + "'" + ", using parent context [" + parent + "]");
}
if (!ConfigurableWebApplicationContext.class.isAssignableFrom(contextClass)) {
throw new ApplicationContextException(
"Fatal initialization error in servlet with name '" + getServletName() +
"': custom WebApplicationContext class [" + contextClass.getName() +
"] is not of type ConfigurableWebApplicationContext");
}
//通过反射方法实例化contextClass
ConfigurableWebApplicationContext wac =
(ConfigurableWebApplicationContext) BeanUtils.instantiateClass(contextClass);
wac.setEnvironment(getEnvironment());
//parent为在ContextLoaderListener中创建的实例
wac.setParent(parent);
//获取contextConfigLocation属性,配置在servlet初始化参数中
wac.setConfigLocation(getContextConfigLocation());
//初始化Spring环境包括加载配置文件等
configureAndRefreshWebApplicationContext(wac);
return wac;
}
调用configureAndRefreshWebApplicationContext方法
无论是通过构造函数注入还是单独创建,都免不了会调用configureAndRefreshWebApplicationContext方法来对已经创建的WebApplicationContext实例进行配置及刷新,这个步骤的具体实现如下:1
2
3
4
5
6
7
8
9
10
11
12
13
14
15
16
17
18
19
20
21
22
23
24
25
26
27
28
29
30
31protected void configureAndRefreshWebApplicationContext(ConfigurableWebApplicationContext wac) {
if (ObjectUtils.identityToString(wac).equals(wac.getId())) {
// The application context id is still set to its original default value
// -> assign a more useful id based on available information
if (this.contextId != null) {
wac.setId(this.contextId);
}
else {
// Generate default id...
wac.setId(ConfigurableWebApplicationContext.APPLICATION_CONTEXT_ID_PREFIX +
ObjectUtils.getDisplayString(getServletContext().getContextPath()) + '/' + getServletName());
}
}
wac.setServletContext(getServletContext());
wac.setServletConfig(getServletConfig());
wac.setNamespace(getNamespace());
wac.addApplicationListener(new SourceFilteringListener(wac, new ContextRefreshListener()));
// The wac environment's #initPropertySources will be called in any case when the context
// is refreshed; do it eagerly here to ensure servlet property sources are in place for
// use in any post-processing or initialization that occurs below prior to #refresh
ConfigurableEnvironment env = wac.getEnvironment();
if (env instanceof ConfigurableWebEnvironment) {
((ConfigurableWebEnvironment) env).initPropertySources(getServletContext(), getServletConfig());
}
postProcessWebApplicationContext(wac);
applyInitializers(wac);
wac.refresh();
}
无论调用方式是什么,只要是使用了ApplicationContext所提供的功能,最后都会使用其共同父类AbstractApplicationContext提供的refresh()进行配置文件的加载。
刷新
onRefresh是FrameworkServlet类中提供的模板方法,在其子类DispatcherServlet中进行了重写,主要用于刷新Spring在Web功能实现中所必须使用的全局变量。下面是初始化过程代码,其具体的使用细节会在后面的文章内介绍。1
2
3
4
5
6
7
8
9
10
11
12
13
14
15
16
17
18
19protected void onRefresh(ApplicationContext context) {
initStrategies(context);
}
/**
* Initialize the strategy objects that this servlet uses.
* <p>May be overridden in subclasses in order to initialize further strategy objects.
*/
protected void initStrategies(ApplicationContext context) {
initMultipartResolver(context);
initLocaleResolver(context);
initThemeResolver(context);
initHandlerMappings(context);
initHandlerAdapters(context);
initHandlerExceptionResolvers(context);
initRequestToViewNameTranslator(context);
initViewResolvers(context);
initFlashMapManager(context);
}